INTRODUCTION
Sometimes, you spend days, weeks, or months on a project piece. You finally finish it, proud of your work (and rightly so), and want to share its glory with the internet. So you whip out your phone, take a picture, and Bam! A picture is immediately developed that looks very little like the miniature you’re looking at.
It’s a scenario all of us, at some point, have experienced firsthand. This post aims to teach, remind or revise some core principles to aid you in getting something that looks like the miniature you’re photographing at all budget levels.
PHOTOGRAPHY PRINCIPLES
It doesn’t matter what you take a photo with, nothing will match the range of colour, depth, and detail that your eyes see and your brain translates. It’s a basic fact that almost every photograph you’re exposed to is touched up in some way shape or form – this is due to the fact that cameras don’t have the same range as your eyes do and cameras cannot conduct the necessary processes as well as the human brain does.
Touching up a photograph won’t necessarily improve the image you’ve taken, and some of the AI-based or automated tools can use outright destructive methods in the detail to make an image “look better” when not zoomed in.
In order to have an end product that is representative, you really need to focus on the photography exposure triad: Aperture, Shutter Speed, and ISO. Each value is intrinsically linked to one another and as a threesome is directly related to the “directly out of camera” product that we often want in miniature photography.
I’ll get something out of the way right now. Having an expensive camera and lens doesn’t produce better photographs automatically. In fact, some professional photographers can produce better quality and interesting photos with a five-year-old camera phone than amateur photographers with an expensive camera and lens. It comes down to understanding the exposure triad, composition, and how to improve the shot naturally/artificially.
Aperture
Aperture is like the pupil of your eye but in the lens of the camera. The Aperture is determined in “f-Stops” and therefore is often seen written at f2.8, f5.6, f16, etc. The lower the Aperture value, the wider the pupil is, and the more light is let in. Effectively, this controls the “depth of field” or the “bokeh” which is the out-of-focus zones in the image. The lower the f value, the more shallow the bokeh is. The higher the f-Stop, the less light is allowed into the camera via the lens, which generally requires a longer shutter speed to expose the image correctly.
Shutter Speed
Shutter Speed is like the movement of your eyelids over the pupils and is a camera function. These are determined in fractions of a second and effectively doubles or halves the amount of light allowed into the lens compared to its previous value. If this sounds confusing, just think about opening your eyes at night or in the middle of the day. At night, the longer you keep your eyes open, the better exposed you are to your surroundings and you can see better as a result. In peak sunlight in the middle of the day, you squint or blink faster to ensure you don’t over-expose your eyes to the light.
Shutter Speed controls the motion in the shot – the higher the Shutter Speed, the less motion should be seen in the final shot. Shutter Speed fractions are generally written as 1/2, 1/4, 1/8, 1/15, 1/30, etc. Shutter Speed is often the easiest to understand as its ratio with the amount of light entering the camera is 1:1, so when you’re doubling the exposure time, you double the amount of light entering the camera.
ISO
ISO is the sensitivity of the camera to the incoming light and you almost always want to use lower numbers versus higher numbers. This is because a higher ISO introduces noise into a photograph that can destroy detail. As a basic rule, the larger the sensor in the camera, the better it is at dealing with noise introduced at higher ISO values. Higher ISO values however are directly linked to higher value Shutter Speeds, so you reduce the effect of movement at higher values of ISO.
Note, this isn’t the “megapixel” of a camera, but the physical size of the sensor behind the lens and shutters. Some of the best cameras at very high ISO are very low-megapixel cameras and produce stunning photos.
MINIATURE PHOTOGRAPHY
Understanding the triad leads us directly to the topic at hand. If Shutter Speed affects motion, we effectively want that dialled into a fairly high value to freeze motion. If Aperture affects the bokeh, we want that at an artistic value that gives some bokeh but doesn’t cause detail to be lost within the fringe of the bokeh (i.e the whole model is in focus). If ISO affects the light sensitivity and the noise levels, we want that at a fairly low value to reduce noise, but still be sensitive to the light present. Before we get to that, however, we need to consider a very basic subject – composition.
Composition
Pictures are really underpinned by composition (excluding the technical camera and lens functions). The positioning and contextualisation of a subject within the frame (the boundaries of the image) convey an emotional or functional response in the viewer.
The simplest way of working composition into your photography regimen is to break the image down into a grid and look to place the subject in a location within that grid to build interest in the photograph.
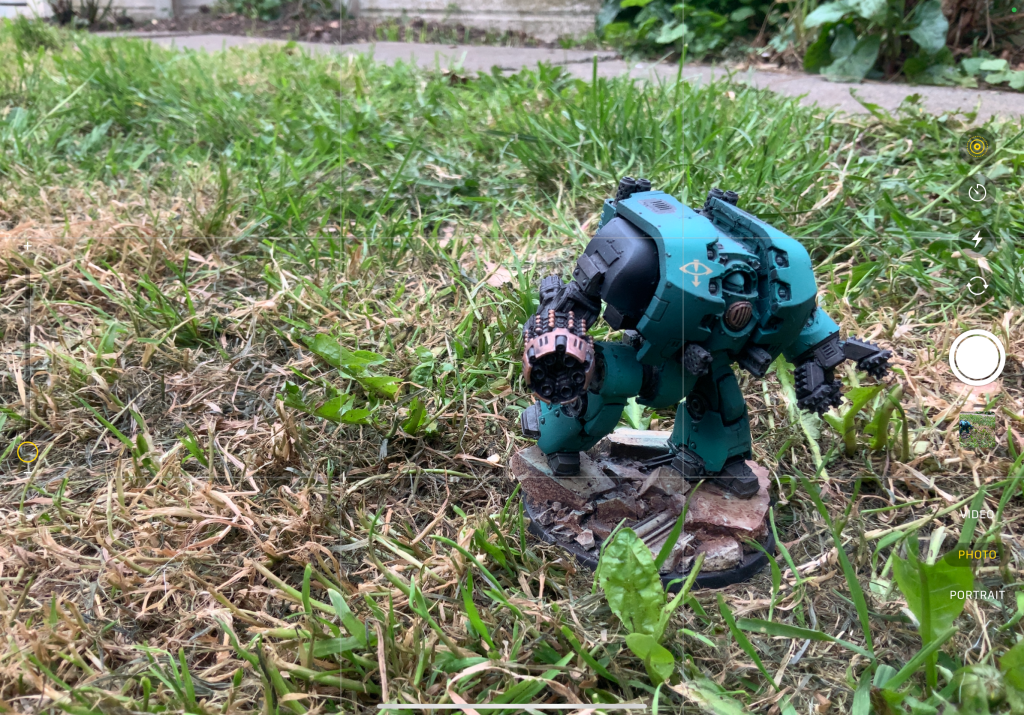
Note: The Leviathan Dreadnought is WIP, the images were taken without additional lighting at 1800 BST and I’ve used an iPad Pro 11 for screenshot generation.


Once you’ve identified what you want your image to convey, you can look at how you want to compose your shot. Before you press that Shutter Release button, there’s some points to consider that might help you get the perfect shot.
Camera Photography
I tend to shoot in Aperture Priority on my Sony A7 (a mirrorless “DSLR”) mounted to a tripod. This allows me to be artistic with the bokeh whilst ensuring that I’m capturing the detail. I’m also not overly concerned about using longer shutter speeds for those wider shots due to the stability of the tripod. Alternatively, manual mode allows me to dial in my own shutter speed and f stop, but you need a bit of experience to get the best from it.
Camera Phone Photography
On my iPhone, I generally handhold and let it sort itself out unless it’s struggling to achieve what I want from it. You’ve always the option to get a phone tripod if you’re experiencing issues with camera shake. If you’re struggling with the shot, then press that f button on the screen and manually adjust the Aperture, Shutter Speed or ISO to help it out. Some phones have entirely manual modes, but for iPhone users, you’ll want to look more into apps like VSCO to truly unlock some powerful capabilities.
Some phones may benefit from a dedicated macro lens clip-on or module – but frankly, anyone can achieve good results without one.
A LITTLE HELP FOR OUR CAMERA FRIENDS
We’ve spoken a lot about the amount of light entering the lens or camera. This is really what makes or breaks a photo. If you want a better miniature photograph, you need to look at improving the quality of light. Note I mention the quality and not quantity. This is simply because too much light can wash out an image, flatten natural shadows or generally be destructive. There are a few ways we can improve the quality of light.
Backgrounds
A simple flock background is fairly easily sourced and is fairly cheap. Alternatively, battle mats can make a neat stand-in for a flocked background, as long as they are mousemat-style material. If you’re completely out of sorts for a background, a humble piece of A4 paper, or using a Games Workshop Codex or Horus Heresy Red Book opened to page one will work.

Lightbox / Softbox
The colour white diffuses and reflects light when it hits a white surface, making it softer and generally better quality light. There are two main products for creating this diffuse, higher-quality light at home. One is a Lightbox, the other, a Softbox.
There are several products on the market for Lightboxes, which have an LED stip in them (some moveable some fixed) and a generally white interior. Lightboxes are a great starting point because they remove the requirement for any exterior lighting in the room to be addressed. On the downside, they often have a harsh, direct LED light somewhere in the box that needs to be addressed. Finally, for those big miniatures, Lightboxes are generally on the smaller side and you can struggle to fit some vehicles in.
Softboxes are effectively a light source that illuminates a white diffuser/reflector panel. There are several products on the market, but you can also make one fairly easily at home using a magnifying lamp and a pillowcase or a sheet of white paper (it won’t be as effective, but it’s fairly good and superior to not using a Lightbox/Softbox at all). The downside to a softbox is that you’ll need a background material and to consider how the light in the rest of the environment is affecting the image. In other words, having a softbox won’t improve the photo if you’ve got a massive white light blaring from another part of the room.
Generally, I use a softbox and place it above and forwards of the miniatures (closer to the camera) in order to give an impression of sunlight hitting the forward edge of the miniatures. However, there’s no end to the way you can use them.
Go Outside
Sometimes, the best light you can get on a budget is the summer sun. Photography outside, on grass or other materials also adds an artistic flair to your photographs that can’t necessarily be easily replicated indoors. It’s worth experimenting with and especially so if you can’t afford the expense or real estate for setting up a lightbox or softbox.

POST-PROCESSING
As mentioned earlier, no matter what your setup, equipment, or how long you devote to photography, you’ll still likely be applying post-processing to the image to improve the representation. Note that you’re not looking to “improve” the miniature by boosting contrast or detail etc. You’re looking to get the image on your screen to match the one you see. It’s therefore beneficial to apply post-processing to miniature photography whilst the miniature is still in the position of being photographed. You can then use that as a reference to ensure you don’t overdo the post-processing.
If you’ve got multiple angles you want to show off, consider using an application that makes collages easier to create. Some great applications for post-processing are:
- Capture One (PC, Mac) – Trial available, One-off pricing options.
- Lightroom (PC, Mac, iOS, Android) – Trial available, Adobe Creative Cloud pricing.
- Snapseed (iOS, Android) – Free.
- Google Photos/iPhotos (iOS, Android) – Free.
- Instagram Layout (iOS, Android) – Free.
SUMMARY
In short, you’re looking at determining what you want from your image and applying the photography triad. For best results use a flock material for a backdrop to not only screen out unsightly or unwanted stuff in the background of the image but to reduce reflections caused by light. Use a Softbox to remove the harshness from the light you’re adding in and consider the position of the light to get the best representation of the model possible.
For some, space and money may not permit a setup using softboxes – so consider the use of a Lightbox. They’re designed to be space-saving and provide you with the ability to better represent your subjects. Lightboxes are often the first purchased solution for miniature photography as a result.
Post-processing shouldn’t overwhelm the image or be used to improve the suggested quality of the model (it’s really obvious when it is done like this). You’re applying post-processing to bring the image you see onscreen closer to the image you see in real life. Naturally, your eyes have a wider f stop range than any camera does and your brain does a better job at calculating the exposure triad than a camera – so use your eyes to reference that miniature you’re photographing, live, to get the best results from post-processing.
Finally, get experimenting with your artistic side and see what you can come up with! The sky is the limit!
EXAMPLES


Great guide!
What I’d love to see is a guide on how to add visual effects to your photos, like you have in your thumbnails.
LikeLike
Edit: Chris, I forgot to hit send.
It’s Werble and if you look at the blog articles, it’s one of the first ones I go posted.
LikeLike